
How-To Utilize the Passenger Web App (PWA)
June 20th, 2022
At the core, our Passenger Web App (PWA) provides a new way to book rides, manage your account, and track your in-progress rides with status updates and driver GPS location.
How to Access Our PWA
Our Passenger Web App (PWA) can be accessed from any mobile browser with an internet connection at the URL: app.larryslimo.com
Mobile Browsers supported: Google Chrome, Mozilla Firefox, Opera, Safari, and Microsoft Edge.
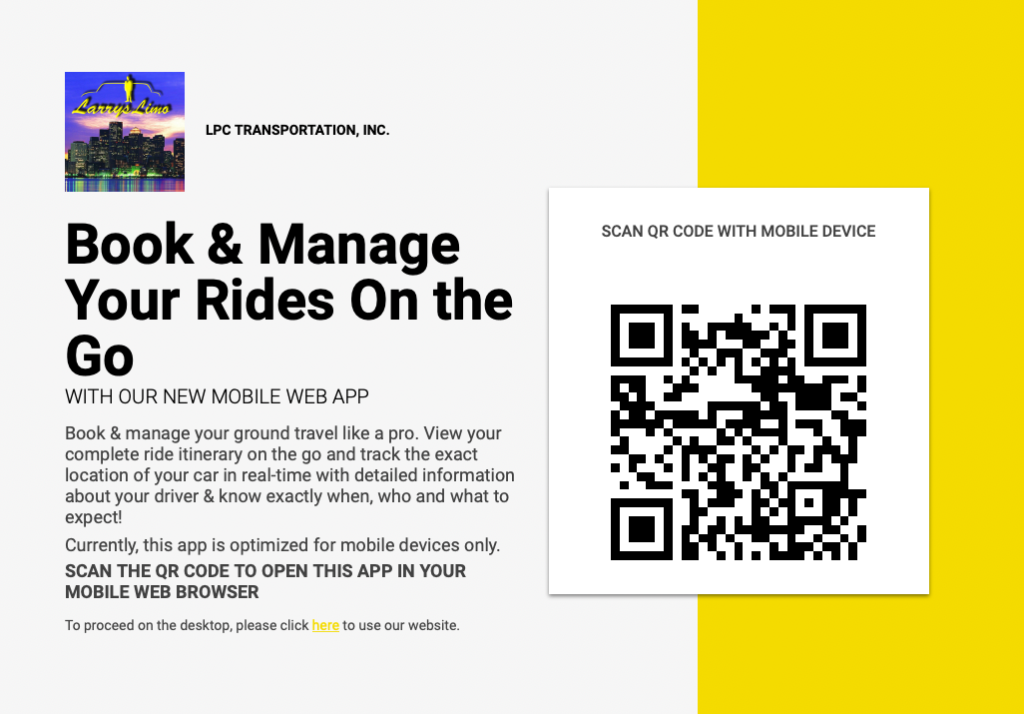
If accessed from a desktop/laptop, then the Landing Page will display a QR Code that your client can scan to open the PWA directly on their mobile device.
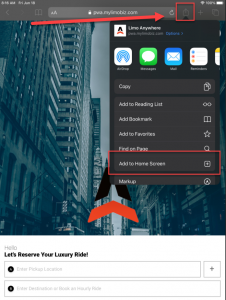
How to Add Our PWA to Your Home Screen
- Open your mobile browser
- Enter the PWA URL
- Once the PWA loads you will either get a pop-up that prompts you to Install or go into the browser menu and Add/Install (depending on browser)
Examples from Chrome and Firefox on Android:

Example from Safari on iOS:
How to Book a Ride in Our PWA
Booking for Yourself
- Enter in Pickup Location
- (Optional) Click the + button to add any Stops in between the Pickup and Drop-off
- Enter in your Drop-off Location and/or Select Hourly and the # of hours
- Click “Confirm Your Route”
- If entered in an Airport as the Pickup location (if not proceed to Step 6)
- If you have your flight information (if not proceed to Step 5b)
- Select your Pickup Date
- Enter in your flight information (Airline Code and Flight #)
- Select where you would like your chauffeur to meet you
- Select when you would like your chauffeur to meet you based on your flight (Proceed to Step 7)
- If you do not have your flight information
- Click Skip (Proceed to Step 6)
- If you have your flight information (if not proceed to Step 5b)
- Select Your Pickup Date and Time
- If entered in Airport as Drop-off location (if not proceed to Step 7)
- If you have your flight information (if not proceed to Step 6aii)
- Enter in your flight information (Airline Code and Flight #)
- If you do not have your flight information
- Click Skip (Proceed to Step 7)
- If you have your flight information (if not proceed to Step 6aii)
- If entered in Airport as Drop-off location (if not proceed to Step 7)
- Select the vehicle you need for your ride
- (Optional) If you need to add Passengers, Luggage, or Child Seats click on the Passenger, Luggage, and Child Seats selection above the Vehicles
- Enter your Contact Information (Name, Email Address, and Phone #)
- (Optional) Enter in a Password if you want to create an Account
- Enter in your Payment Details
- (Optional) Enter in any Notes for the chauffeur
- Click “Book This Trip”
- You will receive the success screen with your Confirmation #
Booking on Behalf of Another Person
- Enter in the Pickup Location
- (Optional) Click the + button to add any Stops in between the Pickup and Drop-off
- Enter in the Drop-off Location and/or Select Hourly and the # of hours
- Click “Confirm Your Route”
- If entered in an Airport as the Pickup location (if not proceed to Step 6)
- If you have the flight information (if not proceed to Step 5b)
- Select the Pickup Date
- Enter in the flight information (Airline Code and Flight #)
- Select where you would like the chauffeur to meet the passenger
- Select when you would like the chauffeur to meet the passenger based on your flight (Proceed to Step 7)
- If you do not have the flight information
- Click Skip (Proceed to Step 6)
- If you have the flight information (if not proceed to Step 5b)
- Select Your Pickup Date and Time
- If entered in Airport as Drop-off location (if not proceed to Step 7)
- If you have the flight information (if not proceed to Step 6aii)
- Enter in the flight information (Airline Code and Flight #)
- If you do not have the flight information
- Click Skip (Proceed to Step 7)
- If you have the flight information (if not proceed to Step 6aii)
- If entered in Airport as Drop-off location (if not proceed to Step 7)
- Select the vehicle needed for the ride
- (Optional) If you need to add Passengers, Luggage, or Child Seats click on the Passenger, Luggage, and Child Seats selection above the Vehicles
- Enter in the Passenger’s Contact Information (Name, Email Address, and Phone #)
- Enter the Payment Details
- (Optional) Enter in any Notes for the chauffeur
- Click “Book This Trip”
- You will receive the success screen with the Confirmation #
How to Register and Create an Account on Our PWA
There are 2 ways you can register and create an account in our PWA
- Create an Account in the Menu
- Click on the Menu button
- Click Sign In
- Click Sign Up
- Enter in Full Name
- Enter in Email Address
- Enter in Password
- Click Sign Up
Note: Your Account credentials will be the email address and password you just entered
- Create an Account on the Checkout page
- Go through Steps to Book a Ride-on PWA (see above)
- On the Checkout page, you can enter a password along with your details to create an account
How to Sign in On an Existing Account on Our PWA
There are 2 ways you can sign in on our PWA
- Sign-in in the Menu
- Click on the Menu button
- Click Sign In
- Enter in Email Address
- Enter in Password (Click “Forgot Password” if you need to reset your password)
- Click Sign In
- Sign-In on the Checkout page
- Go through Steps to Book a Ride-on PWA (see above)
- On the Checkout page, click “Sign In”
- Enter in Email Address
- Enter in Password (Click “Forgot Password” if you need to reset your password)
- Click Sign In